

There are two kinds of Facebook pages in this world: Ones with subcategories and ones without subcategories.
All kidding aside, you might be curious about what subcategories are and why you’d want to use them on your business’s own Facebook page.
No Subcategories
Here is an example of a Facebook page that’s not using subcategories:

Image via NEB’s Facebook
This page’s category (not subcategory) is “Public Figure.” Nikki Elledge Brown is a “communication stylist” (read: copywriting) expert that helps businesses across the country write better copy. She is definitely not marketing to a local crowd. Instead, she’s reaching out to a national audience, so her decision not to use subcategories makes sense.
With Subcategories
Here’s an example of a Facebook page using subcategories:

Image via Screen Graphics Ltd’s Facebook
This page’s subcategories are Graphic Design, Signs & Banner Service, and Office Supplies.
Should You Use Subcategories On Your Facebook Page?
Consider the following to decide whether or not to use subcategories on your Facebook page:
- Adding a subcategory can help with SEO as those subcategories are essentially your page’s search terms and help people find your page using the Facebook Graph Search.
- Are you primarily a local business? If so, you should use subcategories because they tie in with your local area, much like a phone book listing. Subcategories are meant to help people discover your business.
To see what this means, visit our previous example’s Facebook page: Screen Graphics Ltd. Now click on one of their subcategories (I clicked on Sign & Banner Services). It will take you to a list of similar businesses in the area that have also chosen the Sign & Banner Services subcategory in the same geographical area as that business.

- Subcategories give your Facebook visitors a very clear idea of what products and services you offer. Do you provide Consulting/Business Services or do you provide Email Marketing? One is a lot more informative than the other. Personally, this is why I love using subcategories.
Are you sold on the idea of subcategories? Then read on to learn how to add subcategories to Facebook!
Bonus: Download the detailed step-by-step guide that walks you through setting up Facebook subcategories. Get screenshots, notes, and diagrams in an easy-to-follow format!
How To Add Subcategories To Facebook
- Log in to your Facebook account so that you can manage your business’s page.
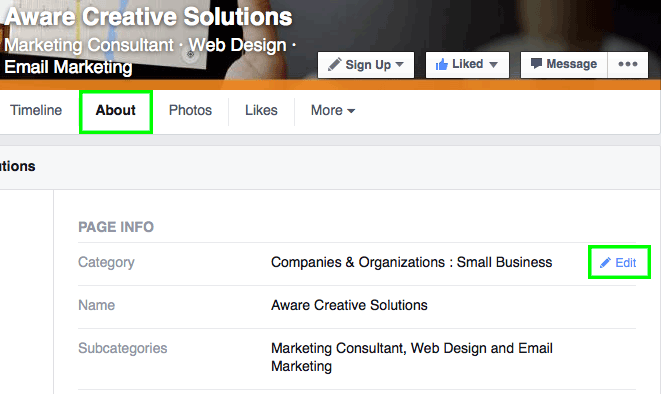
- Go to your page’s About tab. Hover over the Category section. You’ll see the option to “Edit.” Click Edit.
- I’ve gotten subcategories to work by selecting either Companies & Organization: Small Business or Local Businesses: [Any Business Type]. It’s worth trying out other options if they fit your business better to see if you can force subcategories to appear. If they don’t, select one of the above two options, then click Save Changes.
- Depending on what information you’ve put into your About profile already, you may see Subcategories appear right away. If they don’t appear, the next step should do the trick.
- Enter a valid full street address in the Address section, then click Save Changes. After the page reloads itself, you should see the Subcategories field appear.
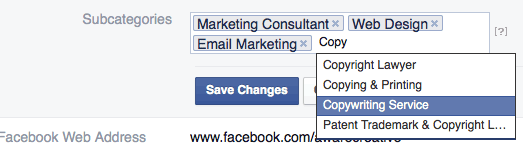
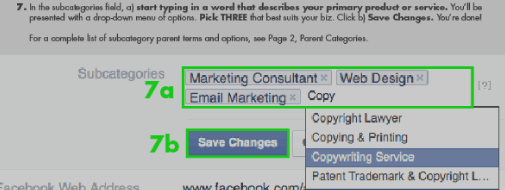
- How to choose your subcategories (maximum: 3) In the subcategories field, start typing in a word that describes your primary product or service. You’ll be presented with a drop-down menu of options. Pick one that best suits your biz.
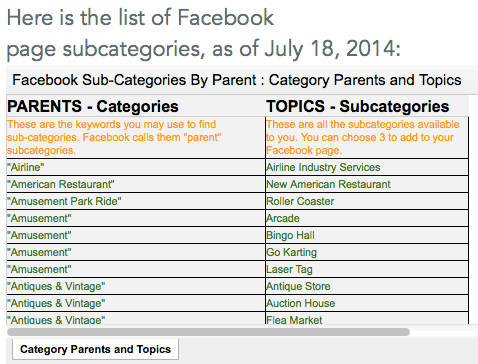
REALLY HELPFUL INFO: Lightspan Digital put together a full list of Facebook’s available subcategories in 2014. The list includes every possible subcategory available and what to type into the text field to get these options to appear. Check it out here.
- When you’re done filling in your 3 subcategories, click Save Changes. They’ll now appear on your page to the right of your profile picture on your cover photo area. Pretty cool, right?
- Optional: If you don’t want your actual street address to show on your profile, you can go back and remove it by editing the address area, then clicking Save Changes. Leave your city and ZIP code filled in. Subcategories will remain and your house number will be removed.
Here’s a helpful video that walks you through the subcategory process:
Featured Download:
The Ultimate Guide for Setting Up Facebook Subcategories
If you need help setting up and optimizing any of your company’s social media pages, check out our Social Media Management programs.
About The Author

I look after our page with business manager. I changed the sub categories and I see them when i go to the page. However, anyone else who goes to the page only see the previous sub categories. I have checked and checked and cannot understand why they are not updating. The new ones are definitely there. It is very strange. Any ideas greatly appreciated.