
Do you really need a $37/month subscription fee for an app just to deliver content upgrades?
How much stuff are you already paying for each and every month?
- Google Apps for Business, hosting fees, domain renewals, Adobe Creative Suite, email marketing software, SEO tools, invoicing and time tracking software, professional organization fees, Spotify (okay, Spotify is a guilty pleasure)
All of the above play an important role in your business, but let’s be honest: those monthly fees add up.
So when you ask a marketer, “Hey, I wrote this great eBook that I want to use as a content upgrade on my website to increase conversions and generate leads. How can I deliver it to my subscribers?”
And someone replies, “Get LeadPages, it’s only $37/month!” You’re like:
![]()

Your face when someone tells you that the only way to get something done is to pay $37/month
Is there really no other software out there that can deliver download goodies other than LeadPages? Nothing…more affordable? Why can’t my email marketing platform handle this since I’m already paying for it? (the answer is: it can)
After researching other solutions over the past few months, I came up with a really viable (and cheap) workaround.
If you’re on a budget or just want to keep that $37 in your wallet, I’d like to share with you what I found to be a really robust, simple and affordable way to deliver multiple unique content upgrades (or lead magnets) without a hefty monthly bill.
Exclusive Bonus: Download the exact 8 step email automation sequence flowchart that we use to deliver our most popular content upgrades (tip: follow simple yes/no logic that shows you what messages to send and when).
Tools you’ll need to deliver content upgrades:
A Blog Post
Create a blog post that you expect will generate a lot of traffic. If you have existing posts, check your analytics to see which one pulls the most traffic and write your content upgrade around that topic.
ActiveCampaign
As your email service provider (ESP). It’s actually cheaper per month than MailChimp for small lists and it does way more useful automation stuff. ActiveCampaign is the secret to this content delivery system.
ActiveCampaign WP Plugin
Optional. This plugin allows you to embed ActiveCampaign’s site tracking code in your pages. It lets you see which subscribers visited what pages on your site and attach their actions to automations. Not necessary for basic content upgrade delivery, but highly recommended.
A Content Upgrade
Or lead magnet that relates to the blog post (PDF, eBook, case study, free webinar, etc.)
WordPress
This post will focus on WP self-hosted only but I’m sure if you’re working on another platform, you could get this to work by modifying some steps.
Form Plugin
An opt-in form plugin that connects ActiveCampaign to your website. We use Bloom since it’s included with another annual subscription, but there are other good ones out there that will work just fine.
WC-AC Hook Plugin
Optional. An eCommerce tagging plugin. Integrates WooCommerce with ActiveCampaign by adding or updating a contact on AC with specified tags when an order is created.
I’m going to assume you have your blog post and lead magnet ready to go.
First thing’s first: you only need the “Lite” version of ActiveCampaign. Their more expensive plans have some worthy features that you can get into later, but for our purposes today, Lite is all you need. If you have 500 subscribers or less, you’re committing to $9/month. Visit AC’s pricing page for more details. (hint: if you don’t see the $9 option in their pricing tables, look for small text that says “Just getting started? Try our lite plan to grow your business). As of May 2016, AC still offers a 14 day free trial.
2. Setting up ActiveCampaign Lists
If you’re coming from MailChimp, you might be adverse to creating more than one master list of subscribers. MC had an issue where creating multiple lists made it difficult to avoid duplicate subscribers and still get a clear view of how subscribers are moving through your automations.
In ActiveCampaign, you can get away with managing multiple lists without that concern by automatically moving subscribers from one list to another once they’ve reached a certain point in your automation.
Something to wrap your head around with ActiveCampaign: The way AC handles contacts/subscribers is fundamentally different than the way MC handles them.
AC lists are held within one master list called the Contact List. All of your contacts are in your Contact List, and from there those contacts can be a part of a specific list – or multiple specific lists – in your account. It’s this difference that allows AC to handle the delivery of multiple content upgrades in a much cleaner fashion than MailChimp (sorry MC, we don’t mean to dump on you! We used MC for years and we still recommend MC to our just-getting-started email marketing clients that want to avoid a monthly subscription).
Example: You can have John Doe as a contact that is subscribed to lists “Dog Shampoo”, “Dog Nutrition,” and “Newsletter.” John could unsubscribe from “Dog Shampoo” and still be 1) on the master contact list and 2) subscribed to your Dog Nutrition and Newsletter lists.
Watch a section of this video for a quick explanation:
For example, if someone downloads a content upgrade about the 10 best dog shampoos, they’d get added to my “Dog Shampoo List” that triggers my “dog shampoo email automation sequence” to start sending to this new subscriber. Perhaps as part of the sequence strategy, I would try to up-sell them our “au natural oatmeal dog shampoo” product.
Then let’s say they go through the entire sequence and don’t choose to buy.
They can keep the [Dog Shampoo Lead Magnet] tag forever, but I can tell AC to move them to my more general “Newsletter” list, remove them from the “Dog Shampoo” list, and remove the [Prospect Dog Shampoo] tag all without having to worry about duplicate subscribers or needing to manually change data.
We currently have a separate AC list for every lead magnet/content upgrade, plus a general list called “Newsletter.” Each new contact added to a list goes through a different automation sequence, receiving the appropriate content upgrade immediately on opt-in.
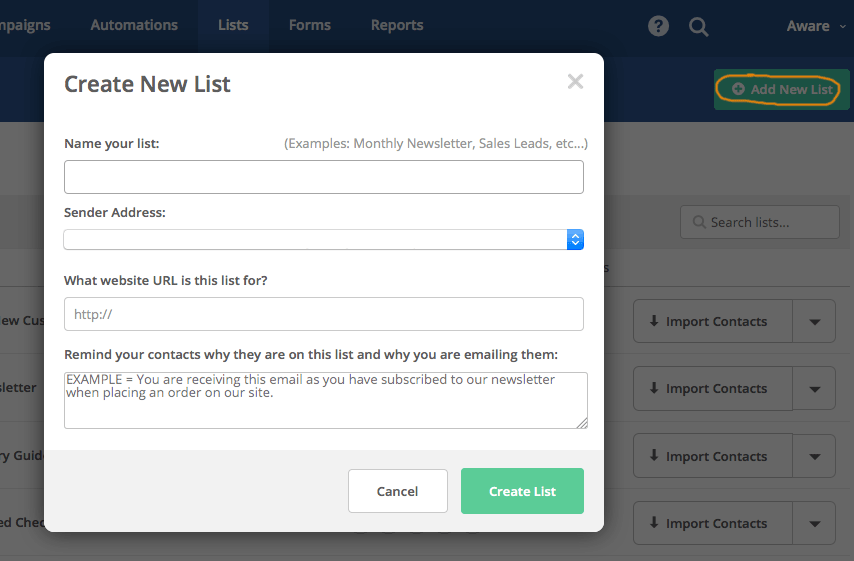
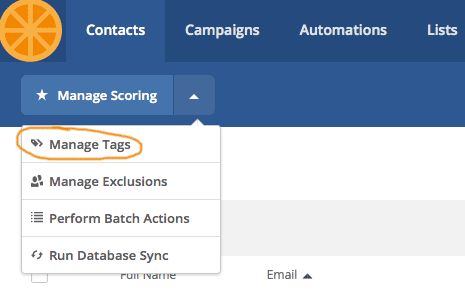
Setup your lists in AC by going to the Lists tab, clicking the Add New List button, and filling in your information. Create a list for each of your content upgrades, and I recommend also creating a “General/Newsletter” list to keep subscribers on that have finished your lead magnet automations.
3. Integrating Subscription Forms On Your Website
There are many ways to add subscription forms to your website. Some are plugin-based and some folks simply copy + paste code snippets out of ActiveCampaign into the HTML text editor of their website.
We’re going to review how we use the Bloom opt-in form plugin from Elegant Themes, but these steps should be fairly congruent to other opt-in form plugins if you still want to follow along and aren’t using Bloom.
After installing Bloom, follow these steps to connect Bloom with your ActiveCampaign account. Then determine where you want your opt-in forms to appear. We suggest you try a few different locations for your opt-in forms – footer, sidebar, on-click pop-up, timed pop-up, locked content – and see what method produces the best results.
This isn’t meant to be a “How To Use Bloom” user guide (Elegant Themes provides thorough documentation), however I do want to mention something that we got stumped on and were able to figure out through trial and error: trigger on click functionality.
Trigger On Click Functionality In Bloom
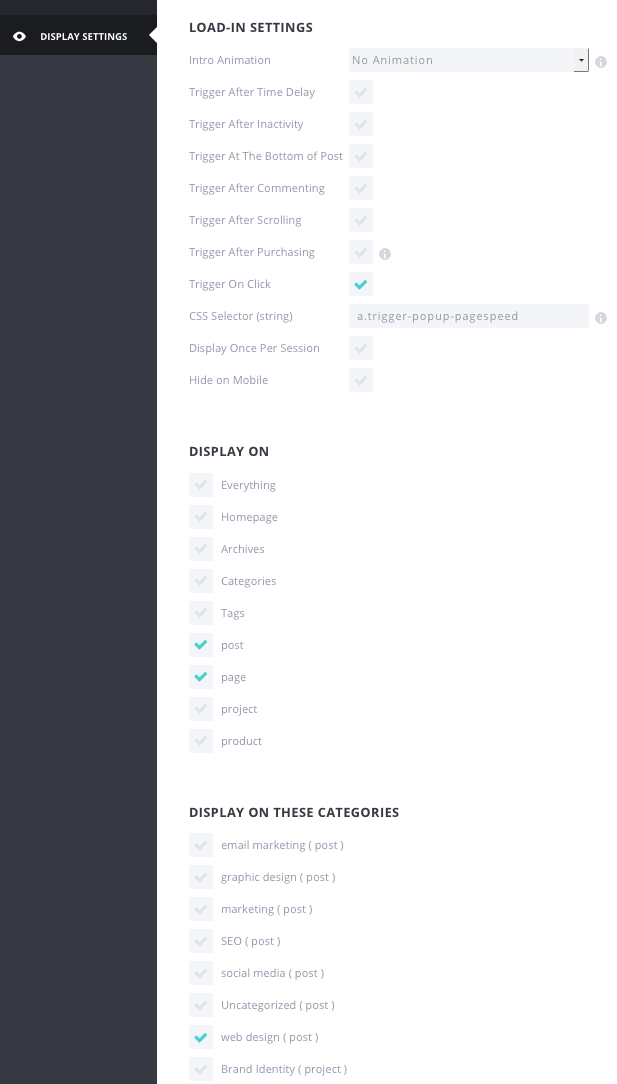
This was the trickiest form type to setup. If you choose to do an on-click trigger (ie: someone clicks a link and a pop-up box shows up), you need to have the following settings in Bloom in order to get it to work properly:
- Choose Pop Up as your Opt-In Type.
- You need to create a CSS Selector (string) in Bloom’s Display Settings in the following format: “a.name-class-here”. You can call it whatever you want, but it must have the “a.” before the class name and the class name must either have no spaces or use dashes to separate words.
- In the Load In Settings, check the Trigger On Click box, leave the rest unchecked.
- Display On Settings: We ticked the Pages and Posts boxes, but it may be different for you. Checking these doesn’t mean the pop-up will automatically pop up on every post and page, it just means that it’s possible to call it on posts and pages.
- If you want to get even more specific, you can choose what Categories you want this pop-up to work on. Below is a screenshot of our settings for one of our Trigger On Click pop-ups:
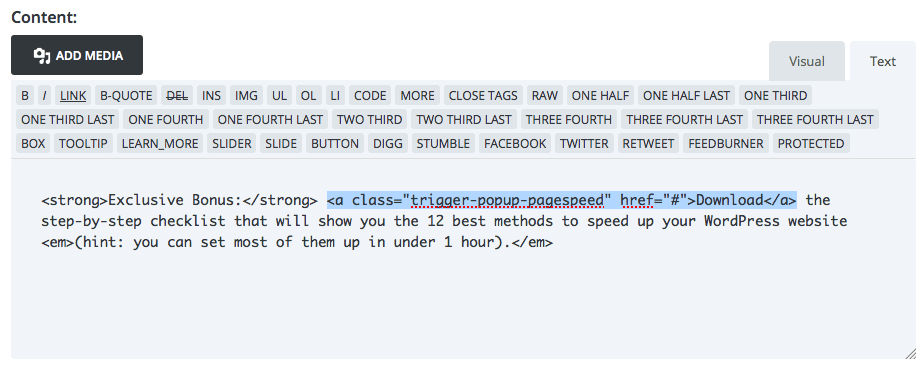
- After figuring out what you want visitors to click that triggers the pop-up window, you’ll need to create a standard hyperlink on your post or page with the following settings around your text or image: <a class=”name-class-here” href=”#”>Download Call To Action</a>. Between the ” ” for class, type in the name you gave your class in Bloom in the previous steps, except omit the “a.” portion of the text. HREF should equal the pound sign (#).
- Test your new pop-up functionality and make sure it’s working the way you want.
Bloom Workaround For New Subscribers Receiving Duplicate Opt-In Messages from Different Lists
Another issue we found was when someone opted in to our PageSpeed Checklist, they’d immediately receive that checklist PLUS they’d receive another lead magnet from a different automation.
This is an issue with Bloom itself as of May 2016. The workaround is to add your ActiveCampaign account to your Bloom plugin multiple times – once for each FORM you have in your ActiveCampaign account. And each form should correspond to the appropriate AC list.
Example: We have a list called PageSpeed Checklist Opt In and a corresponding form called PageSpeed Checklist Opt In.
You can create new forms in AC by going to the Forms tab and clicking “New Form.” The settings for each form don’t matter too much here (although this is where you’ll choose whether you want single or double opt-in confirmation). The important part for Bloom is to pull the Form ID from the Edit Form page URL:
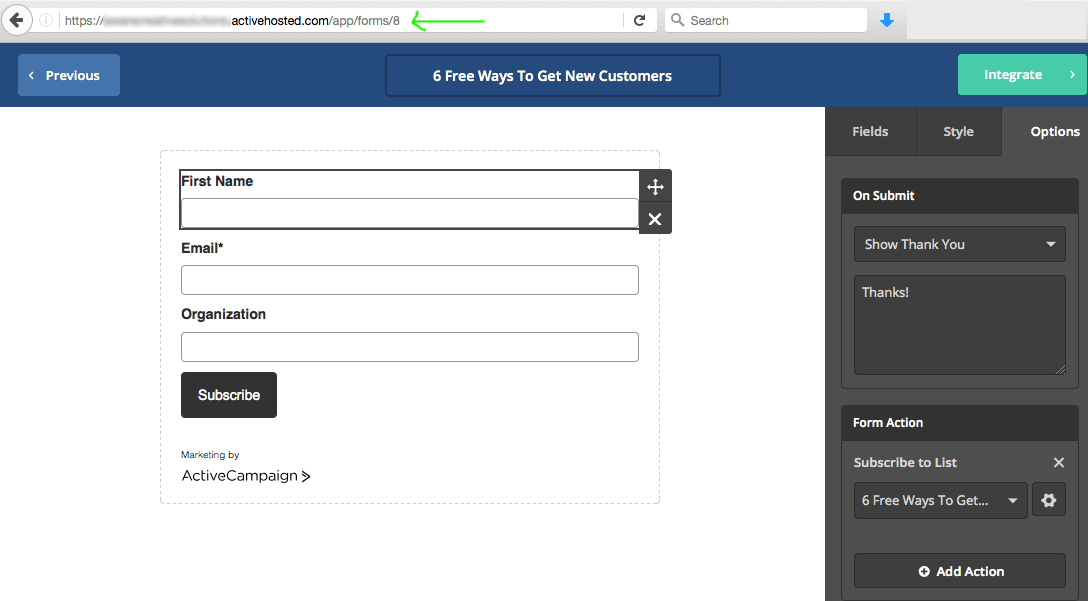
Use that Form ID number in Bloom’s “Add new email account” section, along with the same API key info as before:
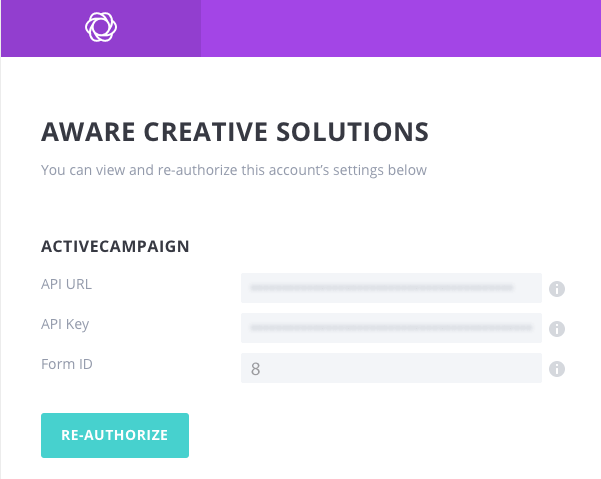
Follow this process for each different opt-in content upgrade – create new forms in AC then add new AC accounts with the corresponding Form IDs in Bloom. Name your various ActiveCampaign Bloom accounts something like “Lead Magnet Name Form” to help keep things organized.
After adding the appropriate AC accounts to Bloom, go ahead and create your forms and connect them with ActiveCampaign as the Email Provider. Then be sure to select the corresponding account and email list for this particular content upgrade:
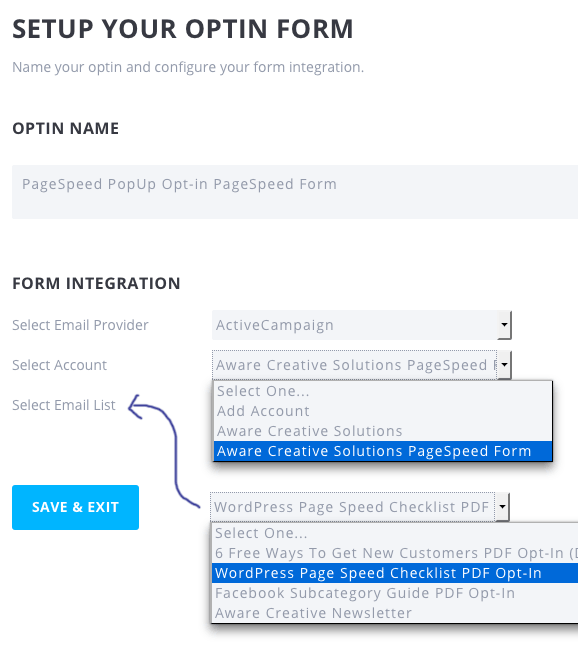
Following these steps ensures that your new subscriber will only receive the correct opt-in goodie.
4. Delivering The Content Upgrade
Once you have your lists, forms, and opt-in plugin working, it’s time to actually deliver your content upgrade to your new subscriber. You’ll want to create a new Automation sequence in ActiveCampaign for each lead magnet you wish to deliver.
- In AC, go to the Automations tab and click the green button “New Automation.” You’ll be prompted to “start from scratch” or choose one of their pre-built automation sequences to help you lay out a template for automation email communication.
Since this guide is focused on how to deliver content upgrades and not email sequence strategies, let’s just choose “start from scratch” so you can get the idea behind how all this comes together.
- On “How will your contact enter your automation?”, choose “Subscribes.” This starts the automation when a lead subscribes to a list and will run anytime anyone subscribes to this list.
- On the “Action Options” screen, for “Select List:”, you’ll see a drop-down menu that allows you to choose from all the lists you setup for your various content upgrades in previous steps. Choose the list for the corresponding content upgrade you want to deliver.
For “runs once/runs multiple times,” either will work. I’ve set ours up to run multiple times. What you’re deciding on is whether you want the same contact to be able to enter this particular automation more than once or only once.
Let’s say Bob opts in for our PageSpeed content upgrade in September and then he forgets he did (or can’t find the original email with the download link). Setting “Multiple Times” here lets Bob opt in again (without adding a duplicate contact entry), puts him back in the automation, and delivers the content upgrade to him again.
Click “Add Start.”
- Once you’re on the automation flowchart screen, click the “+” button to add a next step.
You can do a lot of things here, like add a tag to indicate the contact downloaded your [Lead Magnet NAME]. You can also add a [Prospect] tag if you intend to try and up-sell one of your paid products/services. You can have AC send you an email notification or SMS message to let you know someone just entered this automation.
The important part about content upgrade delivery is to choose Sending Options > Send an email. Within this email (that you’ll need to create within AC), you will include a link for your contact to download your content upgrade. In WordPress, this means that you go to Media > Add New, upload your PDF/video/file, and grab the URL of the new media asset that will act as the link. Here’s an example of what your delivery email could look like:
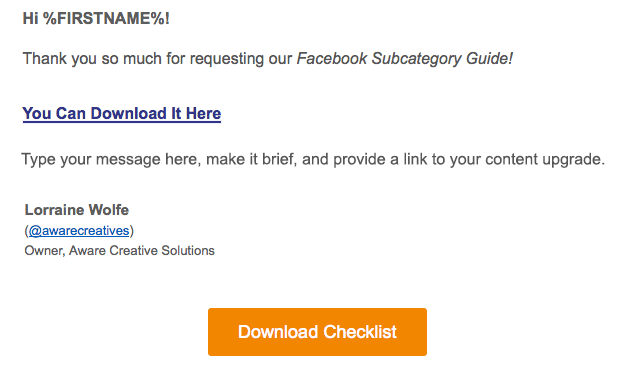
- Setup your delivery email just like any other email marketing message: Carefully craft your subject line, message, sent from: name, and tracking options.
- Once your message is ready, click Save in AC and you’ll wind up back on your Automation flowchart page. From here, the sky is the limit. You can continue to build out your autoresponder sequence adding all sorts of decision making tree criteria (wait X number of days, wait until contact clicks a link, if contact clicks a link add a new tag). There is too much to explain here, but once you get accustomed to ActiveCampaign, you will absolutely fall in love with their automation capabilities.
5. Testing Content Upgrade Delivery
Now is the moment of truth: You’re going to see if your new content upgrade delivery system is working! Go to your LIVE page (posts cannot be drafts), fill in your email address, and click your “subscribe” button.
Within 5-10 minutes, you should receive your welcome email with the content upgrade download link included. You’ll also see yourself as a new contact in ActiveCampaign as well as a subscriber to the corresponding list.
If you want to conduct testing on more than just your email address, I recommend a free service called Throw Away Mail. They give you a temporary working email address that you can use to test your email marketing messages. Once you’re done testing, you can go into AC and delete the fake emails so they don’t clutter up your list.
And that’s it! You can repeat this process as many times as you’d like to deliver content upgrades – with as many variations as you like – to subscribers without paying $37/month for LeadPages.
Helpful Post for Die-Hard MailChimp Users: Do you have your heart set on using MailChimp to get this done? Here’s a great post that talks about how to use Zapier with MailChimp to do something very similar, with a little bit more manual maintenance. Yes, Zapier has a monthly subscription fee too unless you keep “zaps” under 100 per month.
Have you found a work-around to LeadPages using another email marketing platform or opt-in system? We’d love to hear about it! Tell us in the comments below.
Once I Set This Up, How Do I Know When To Send?
We put together a visual flowchart showing exactly when to send automated email messages to your new subscriber once they’ve opted-in to your content upgrade.
The flowchart contains the exact 8 step email automation sequence we use to deliver our most popular content upgrades.
Click below to download the flowchart:
Featured Download:
Email Marketing Automation Sequence Flowchart
About The Author

Lorraine Wolfe
With 11+ years of marketing & design experience, Lorraine is constantly learning new techniques to bring more value to your company. When she isn’t reading her newest marketing book, she can be found doing one of four things: fishing, snowmobiling, micro-brew tasting or watching Star Trek. She’s the proud owner of both a chihuahua and a doberman.

Lorraine, thank you for the comprehensive post. I liked the final touch of the content upgrade at the end with Bloom.
As I understand it, you have one form, one list and one automation for every content upgrade. Doesn’t that get impractical? Wouldn’t it be better to have just one form/list to rule them all? 🙂
This was discussed on the ActiveCampaign marketplace: https://www.activecampaign.com/marketplace/recipe/content-upgradeasset-lead-magnet-delivery
And it looks like you may be able to do this with just tags or events, although I’m not sure about how to setup that up: http://feedback.activecampaign.com/forums/238014-feedback-ideas/suggestions/8547913-have-the-ability-to-create-variable-tags-and-or-ta
Joao, I’m glad you found the post informative!
I’m sure you could do multiple content upgrades and multiple email sequences with one list and one automation, but when I think about how it would be done in my situation, it seems to me like that one automation sequence would be HUGE and potentially more confusing than separate automations.
Consider that each of my sequences has different emails, with different copy, different calls-to-action. The structure is about the same (timing, if/thens), but all the content is different. In the end, both options – multiple forms/multiple automations or one form/one big automation – are going to be a lot to manage, but I assume both would work.
Also, consider the tool I’m using: Bloom. While it’s a nice tool for opt-ins, if I stuck everything into one form, I couldn’t use Bloom as it needs to be tied to a specific form (ex: Form A submitted, start Automation Sequence B). There may be another opt-in form that can handle this better.
Hi Lorraine,
Thanks a lot for this great post.
I have noticed that if you already have a contact (email) in one list inside Active Campaign, when you try (using Bloom) to add that same contact (email) to a different Active Campaign list, Bloom gives an error message saying something like “You selected a list that does not allow duplicates, the email xyz is in the system already, please edit that contact instead”.
Do you have a workaround to solve that big Bloom problem?
You cannot add the same contact (email) to more than one list in Active Campaign using Bloom.
Thanks a lot for your help!
Jorge,
Very glad you found the post helpful!
I haven’t encountered that issue before, but I dare say it sounds like a bug with Bloom. Have you put in a support ticket with Elegant Themes? Or read through ET’s support forum for folks with the same problem? (digging through their forums was how I found a fix to the duplicate email send issue)
That’d be the first thing I would do. Although it doesn’t sound like an Active Campaign issue, AC does have a pretty active support forum and it might be worth asking folks there if anyone has found a work-around.
Wish I could be of more help. If you find a solution, I’d appreciate it if you could share it here with our readers. Good luck!